Tuesday, April 23, 2013

Finally a Meal Plan for 7 Days!!!

Day 1:
  • Breakfast: Bacon, Tomato, Eggs, and Avocado with half a banana and half an orange
  • Lunch: Tuna Salad  Applesauce, Carrot Sticks, Cucumbers, Grape Tomato Strawberry
  •  Dinner:Grilled Fillet Mignon with mashed cauliflower
Day 2:
Day 3:
Day 4:
Day 5:

Day 6:
Day 7:
Snacks and Sweet Treats:

Monday, April 1, 2013

Follow on Facebook

Hello!  I wanted you to know that you can follow I am a Domestic Diva on facebook.  Simply type
"I am a Domestic Diva" in the search bar and like the page.

I also wanted to take this opportunity to thank you for following my blog and apologize for the lack of posts over the last week.  We have had a house of sick children and one that was hospitalized making it a little more difficult to blog.  We are all on the mend and posts will resume in the next couple of days!

I hope you all had a Happy Easter!!


Thursday, March 28, 2013

A full load of dishes with no dishwasher detergant...

Sooo, this has not exactly been a stellar week for me.  I have had extra kids every day and my focus, well, what focus is really the question.  My intentions for going grocery shopping, creating a meal plan, and well picking up the supplies that we need for our home have been put off.  So yesterday I found myself with a sink full of dishes and a dishwasher waiting to be washed...but no dishwasher detergent. Which brings us to Thoroughly Clean Thursday!  What was a girl to do, of course you can't use dish soap in the dishwasher, that's just asking for a mess...or could I???

It was worth a shot and a shot I was willing to take as I couldn't leave the house and not willing to hand wash all those dishes. So with shrugged shoulders I figured why not, what's the worst that could happen, a clean kitchen floor? 

So here is the rest of the story:

After trying out a pin from Pintrest to clean your dishwasher there was a recommendation to use baking soda and vinegar in your wash...I also have recently been looking up recipes for dish detergent, which all include borax and washing soda, but no baking soda.  So here is what I decided to do, and although I'm not recommending this for every load, it worked in a pinch, and today I will give in and pick up the ingredients for my dish detergent that if it works, I'll be posting in the upcoming week:

1 Tablespoon Mrs. Meyers Liquid Dish Soap
1/4 cup Baking Soda
1/4 cup Borax
White Vinegar as a rinse agent in my rinse container

Guess what, it worked.  My dishes were clean and there was nothing stuck on or anything and my kitchen floor, well that still needs to cleaned.  The baking soda prevented the liquid dish soap from  making a massive mess on my floor!

So if you're in a pinch, give it a try! :)

Wednesday, March 27, 2013

Raspberry-Granola Pancakes

I  love pancakes on a cold morning.  It's still quite chilly here in Northern Wisconsin for the end of March.  Nearly Easter, and I'm thinking that this recipe is perfect for Easter Morning.  You'll want to make the granola ahead of time if you're planning on making it from the recipe linked below.  I found this recipe in an advertizement in my most recent Clean Eating Magazine.  Which by the way is a fabulous magazine full of nutritional information and great recipes!

Raspberry-Granola Pancakes
Once Again Organic Sunflower Seed Butter
Makes 12 pancakes

Ingredients: 
1 cup blanched almond flour 
2 tbsp granulated sugar Honey or less
1 1/2 tbsp baking powder Apple Cider Vinegar
1/2 tsp salt
1 cup unsweetened vanilla almond milk 
1 large egg
1/3 cup Once Again Organic Sunflower Seed Butter
2 tbsp butter coconut oil, melted 
1 tsp pure vanilla extract 
1/2 pint fresh raspberries, chopped
1 cup Paleo Vanilla Granola, without dried fruit or nuts
Pan spray Coconut Oil for pan


1. Whisk together the blanched almond flour, sugar honey, baking powder apple cider vinegar, and salt in a bowl. 
2. Whisk together the unsweetened almond milk, egg, sunflower seed butter, butter melted coconut oil, and pure vanilla in a separate bowl. 
3. Add the wet ingredients to the dry ingredients, stirring just enough to combine.  
4. Gently fold in the raspberries and granola.  Break up any large pieces of granola before adding.  The batter will be thick. 
5. Heat a nonstick pan or griddle over medium-low heat.  The pan should not be very hot or the fruit will burn before the pancakes are cooked.  
6. Spray the pan with pan sprayGrease the pan with melted coconut oil.  Add scant 1/4 cups of batter to the warm pan, spreading the batter slightly with the back of a spoon.  Cook slowly until the edges are dry and the bottom is deep golden brown.  Flip, flatten gently with a spatula, and continue cooking until the other side is deep golden brown. 
7. Serve immediately with maple syrup. 


Enjoy and Happy Easter!

Monday, March 25, 2013

Weekly Menu Plan

Day 1:
  • Breakfast: Scrambled Eggs, Sauteed Garlic and Spinach with a Paleo English Muffin
  • Lunch: Soup and Salad of your choice
  • Dinner: Hamburgers with sliced tomatoes, onions, guacamole  and lettuce with sweet potato slices
    • 2 lbs grass fed ground beef, 1/2 tsp. salt, 1/4 tsp. pepper, 2 free range eggs, 1 Tb. onion powder, 1 Tb. garlic powder
  • Snack: Mood Boosting Juice
Day 2:
Day 3:
Day 4:
Day 5:
  • Breakfast: Crockpot Oatmeal topped with chopped apples, walnuts, and drizzled maple syrup
  • Lunch: Leftovers
  • Dinner: I know, leftovers again...but hey you have to use them up!
  • Snack:Mood Boosting Juice

Day 6:
Day 7:
Sweet Treats:

Sunday, March 24, 2013

Color Your Easter Eggs Naturally


Looking for way to naturally dye your Easter Eggs with your little ones?  A sypecial thank you to Shine from Yahoo for sharing 8 Ways to Make Organic DIY Food Coloring.


There are so many great suggestions in this article to use natural alternative to the harmful dies to enjoy this tradition worry free, with a little extra elbow grease you'll be dying Easter eggs in no time.

Cleaning your Oven

Well, it's about time I do the dreaded duty of cleaning my kitchen, cleaning my oven.  I'm not a fan of the high fumes left in most oven cleaners, seem to work and have an enormous amount of warnings, and come with a high price tag.  So, thankfully Naturally Maid Cleaning has graciously shared her no fail technique with us on "How to Clean your Dirty Oven".    She has three no fail techniques listed below:

The Old Standby Oven Cleaner

  • 5 TBSP Baking soda
  • 4 TBSP White vinegar
  • 3 drops hand soap or liquid dish soap 
Mix ingredients until they form a thick paste. Apply paste to inside of oven and scrub. Wipe clean and rinse thoroughly.

Heavy Duty Stain Cleaner
  • 1cup Salt
  • 1cup Baking soda
  • 1cup Water
Make a paste using the ingredients and apply to the inside of the oven. Close door and heat oven to 500-degrees for 60 minutes. Turn off oven and allow to cool. Wipe debris from oven using a moist cloth or sponge. Rinse well.

Overnight Sensation
  • 1 cup of baking soda
  • 1/2 cup of washing soda
  • 3 tablespoon liquid dish soap
  • Hot water
  • 1/4 cup of white vinegar
Remove all loose foods, crumbs, etc from oven first. Combine all the dry ingredients and gradually add hot water until a thick paste is formed. For really greasy ovens, you can add another 1/4 cup of the washing soda. Add vinegar (yes, it will fizz). While oven is cool, coat all oven surfaces with the mixture. Leave overnight. The next morning, use warm water to wipe it clean.

Wednesday, March 20, 2013

Cold and Flu Healing Broth

Often when your searching for something to comfort a cold or flu chicken broth comes to mind.  After all, isn't that what you're told to use?  Faithful Provisions has a great broth that is sure to help kick a cold or flu.

The healing elements in this broth consist of:
  • Lemon - strong antibacterial, antiviral, immune-boosting and weight loss aid
  • Ginger - gastrointestinal Relief, anti-nausea, anti-inflammatory, immune boosting
  • Garlic -antioxidant and antibiotic
  • Cayenne Pepper - anti-irritant, anti-fungal, headache prevention, anti-allergen, digestive aid, anti-inflammatory, detox, and antibacterial
  • Honey - anti-bacterial, anti-fungal, anti-fungal, reduces cough and sore throats
These are just a few of the many benefits that each of these common kitchen items have stored in them, right inside your kitchen shelves.  This is safe for both children and adults.  Drink a cup at a time and make this in large batches to keep for a few days.  Drink as needed. 


Natural Healing Broth
  • 6 cups distilled water
  • 1 whole lemon, juiced. Do not discard rind.
  • 2-3 tablespoons of fresh gingerroot, medium slices
  • 5-6 garlic cloves, crushed (Crush with the flat side of knife to release the juices, then drop the whole thing into your pot.)
  • ¼ to ½ teaspoon cayenne pepper (to taste)
  • Honey to taste
Instructions
  1. Put water in a medium saucepan on high.
  2. Add lemon (juiced) and entire rind, gingerroot, garlic.
  3. Bring to a rolling boil, then reduce to medium. Allow it to cook at a low, rolling boil for about 15 minutes. You will see the color begin to change and deepen.
  4. Add the cayenne pepper.
  5. Strain.
  6. Add honey to taste to individual cup.
Use a cup-sized mesh strainer and put over cup to strain it one cup at a time. (Keep the broth on the stove on low throughout the day when sick.) After adding honey, taste it. If you can handle more cayenne, then add it for optimal effect.

Paleo Raw Vegan Chocolate Chip Cookie Bites

Twisted Tuesday is a day late but worth it!

I love sweets!!!  I completely love anything that has chocolate and then add the word cookie dough and I am hooked!  Well when I saw the recipe below from Averie Cooks I was hooked, but knew it needed some changes...but very minor!


Paleo sort of Raw Vegan Chocolate Chip Cookie Dough Bites
2/3 c raw unsalted cashews
1/3 c oats 1/3 c almond flour
2 Tbsp ground flax seed
2 Tbsp Agave 
2 -3 Tbsp Maple Syrup (Omit and use Agave to preserve true Raw Status if you care)
1 Tsp PURE Vanilla Extract
1/4 c Chocolate Chips - Enjoy Life chocolate mini's work best! (or to preserve true raw status, take 2 Tbsp Raw Cocoa Powder and add 1 Tbsp Agave Honey/Maple Syrup, optional dash of pure vanilla extract, whisk and blend.  Spread into a thin layer on wax or parchment paper, freeze.  Take frozen chocolate off parchment and crumble the shreds into the mixture as your raw “chips”.)
Recipe Yields: Approximately 17 1 tsp. size Cookie Dough Balls

These are made right in your blender.  Combine the cashews and almond flour right in your blender until together you have a almond/cashew flour texture.  Add flax seed and blend.  Add remaining ingredients minus the chocolate chips and blend.  Fold in chocolate chips and roll dough into balls.  Store in refrigerator.

Enjoy, oh and from my standpoint...make a double batch!

Monday, March 18, 2013

Menu Planning Monday

Day 1:
  • Breakfast: Easy Crockpot Breakfast Pie
  • Lunch: Cold Cut Sandwich on Paleo Bread
  • Dinner: Zoodles and Squoodles Pizza Casserole with tossed salad and your choice of dressing
    • Cooking tip: Zoodles and Squoodles is very watery and must sit for more than an hour to absorb all the liquid.  If you meal prep, slice your yellow squash and zucchini and allow it to sit with sea salt on towels to release moisture while you begin to prepare other components of your meal(s).  Then slice your noodles into linguini noodles and your casserole should have next to no liquid once it's done cooking.  The reason that this is on Day 1 is so that you can begin with releasing the excess moisture while preparing days 2 - 7.  This way by the time you complete meal 7 your casserole will be cooked and your refrigerator will be full of wonderful meals! :)  ENJOY!!!
Day 2:
  • Breakfast: Scrambled Eggs (no milk, just whisk your eggs and add some seasoning)
  • Lunch: Leftovers
  • Dinner: Crockpot Fajitas
    • Modifications needed: Skip the packet of taco seasoning and use this recipe:
      • One Packet: 1 teaspoon chili powder 3/4 teaspoon paprika 1 teaspoon cumin 1/2 teaspoon onion powder 1/2 teaspoon garlic powder 1/4 teaspoon ground coriander (Optional) 1/8 teaspoon cayenne 1/2 teaspoon salt
    • Skip the shell and use butter lettuce or large romaine lettuce leaves
    • For Paleo no sour cream - but a generous topping of guacamole and you won't even miss the sour cream! :)
Day 3:
Day 4:
  • Breakfast: Paleo Breakfast Burrito
  • Lunch: Leftovers
  • Dinner: Cashew Chicken with  Asian Salad
    • Modifications Needed: 
      • Sub out the brown sugar for Maple Syrup or skip it all together!  
      • Olive oil for Canola Oil.
      • Almond flour for all purpose flour
Day 5:

Day 6:
Day 7:
  • Breakfast: Pure Banana Pancakes (we eat these at least once a week because they are great cold as a snack for the kids as well...and they are so quick and easy!)
  • Lunch: Leftovers
  • Dinner: Clean out the refrigerator because tomorrow starts a new meal plan!!! If you have leftovers, try to finish them up to go into the next week, or take a break from cooking tonight and go out to eat!!! 
Sweets & Treats:

Friday, March 15, 2013

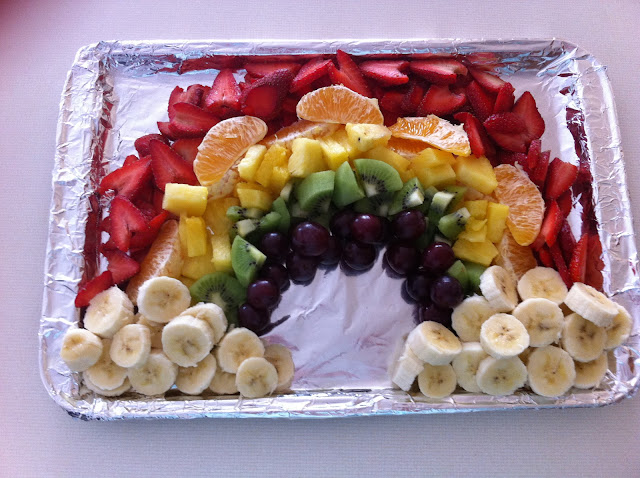
St. Patricks Day Snack

Happy Friday!  It's almost St. Patrick's day and also my daughter's snack day at school.  They are supposed to bring a fruit or vegetable for snack and when I send veggies, I tend to have them returned home hardly touched...where is the love for the veggies? 

Sooo, this time around I decided that fruits were in order, and something St. Patrick's day"ish".  After surfing around Pintrest for a while I finally found it, but of course with some modifications, here is the final product:


Ingredients:
Red = Straweberries (or watermelon, red apples, raspberries)
Orange = Oranges (or nectarines, peaches, cuties, etc.)
Yellow = Pineapple (bananas w/ peel on)
Green = Kiwi Fruit (or green grapes, green apples)
Purple = Red grapes (or blueberries, blackberries, plums)
Clouds = Bananas (toss or mist a little lime juice to prevent the bananas from oxidation or browning)


So what were the modifications you may be asking yourself?  Well it was cute and fitting for the holiday so I'll share - marshmallows for one of the clouds and Rolos candies for a pot of gold on the other end of the rainbow. Unfortunately, these may look good, they have no value nutritionally, so bananas it is!!!

 ++My 5 year old and her class mates were quite pleased. Win-win for everyone!!!  Enjoy and Happy St. Patrick's Day!!!


Thursday, March 14, 2013

Counter Spray

For years I have been using the same counter top spray.  It smells good, it seems to do a good job and it is Eco-friendly...and then I bought a new sent of that same brand.  It ruined it for me!!!  The smell was so potent that I couldn't handle it anymore...no longer was it the smell of "fresh and clean" but floral gardens cheap body spray and it was overkill!!!  It nearly made me sick to my stomach.  So what was I to do? Water it down?  Well I could, but then what good is the cleaner as it isn't cleaning as well as it had or was intended too.  So I decided it's about time to make my own and Nature's Nurture had a great recipe!!!!  (Not to mention one that I had all the ingredients too in my cupboard) Earth friendly and a fraction of the cost of my previous one...oh, and I made it by the gallon!!  Even better!!!! I'm sure you're thinking but what are its results....well...they are substantially better then my "leading" brand cleaning spray!!!  I know you're dying for me to tell you what it is so here is what you'll need:

Essential Oil Counter Top Spray

1/8 ounce Tea Tree Essential Oil
1/4 ounce Sweet Orange Essential Oil
1/8 ounce Eucalyptus Essential Oil
1/8 ounce Lavender Essential Oil
1 Gallon Distilled Water


*Make sure sure oils are 100% Pure Essential Oils and not just scented oils. The essential oils used are anti-bacterial, anti-infectious, anti-septic, and anti-viral.  Also make sure that if you are making a large batch of this that you are using a glass container as the oils will break down the plastic container over time.  Many health food stores will carry the glass containers.


If you are wanting to make a smaller batch to try it out, follow Nature's Nurture recipe:

1 cup water, distilled or filtered
5 drops orange essential oil
3 drops lavender essential oil
2 drops eucalyptus essential oil
2 drops tea tree oil

The best part about essential oils is that they have many uses other than just cleaning agents!!!  Take a look at the following example of Eucalyptus oil:
 

Wednesday, March 13, 2013

Cold and Flu Relief

Cold and flu season was a beast this year!  If you had the flu or have it now you know that it comes with nasty congestion, sore throat, and a heavy cough.  If you haven't tried "Maggie's Cough Remedy" yet, it's a must try before hitting the relief isles at your local drugstore, a special thank you to Good Food Matters for this fabulous Wellness Wednesday recipe!


MAGGIE’S COUGH REMEDY
¼ teaspoon Cayenne
¼ teaspoon Ginger
1 Tablespoon Cider Vinegar (an organic one, like Bragg’s, is preferred.)
2 Tablespoon Water
1 Tablespoon Honey (use a locally produced raw honey, if possible.)


Dissolve cayenne and ginger in cider vinegar and water. Add honey and shake well. Take 1 
Tablespoon as needed for cough. 

Note: This is potent albeit watery syrup. It also doesn’t dissolve perfectly. Always shake well before using.


After all, the philosophy of our home is that of Hippocrates, “Let food be thy medicine and medicine be thy food”.

Tuesday, March 12, 2013

Creating Paleo Slow Cooked Meatballs

You may have noticed that one of my menu items needed a bit of modification this last week.  I forgot to help you out though to ensure you that all items would be gluten free:

For this weeks Twisted Tuesday we will modify the recipe (that I saw many of my friends pinning on Pintrest) of this weeks menu for the Slow Cooked Meatballs  provided by "Stay for Dinner".


NOW PALEO Slow Cooked Meatballs

(serves 4)
1 lb lean ground beef or turkey
½ cup fresh bread almond crumbs  flour(1 slice of your favorite bread aprox. 3/4 cup almonds ground in a food processor or store bought almond flour will work as well)
1 tablespoon dried oregano
2 teaspoons fresh minced basil
¼ cup finely grated Parmesan cheese skip it (or try this substitute: 1 cup Brazil nuts,1 teaspoon chopped garlic, 1/3 teaspoon salt. Process the three ingredients in a food processor till fluffy.)
¼ tsp salt
½ tsp pepper
¼ cup milk 1 egg

Remaining Ingredients:
½ large onion, chopped
16 oz (2 cups) of your favorite homemade (or store-bought marinara sauce - if you are using this make sure there are no added ingredients such as sugar!!!)
Instructions:
Combine all meatball ingredients in a large bowl using your hands Pampered Chef Mix and Chop. Do not overmix. Roll Scoop the mixture into balls roughly 1 1/2″ in diameter using the Pampered Chef Large Scoop.
Scatter the chopped onion (chop this using the Pampered Chef Manual Food Processor) over the base of your slow cooker, followed by the meatballs. Pour the sauce evenly over the top, making sure to coat everything.
Cook on low for 6-8 hours.

Monday, March 11, 2013

Menu Planning Monday


Day 1:
  • Breakfast: Scrambled Eggs with Canadian Bacon and Diced Tomatoes
  • Lunch: Petite Cucumber Turkey Sandwiches & Strawberry Almondade Yogurt Parfait (toasted Almonds and fresh sliced strawberries)
  • Dinner: Rotisserie Chicken* & Steamed Broccoli with your choice of seasoning
*De-bone your chicken saving all the bones and leftovers of chicken scraps, and broth/"juices" from your chicken to make stock overnight in your slow cooker!!!  You will also need to same all your left-over chicken for tomorrows lunch.  See the recipe for overnight stock here. (When getting ready to make stock, many of the ingredients are the same as what is in your Chicken Healing Soup, so make sure you prep the ingredients at the same time for maximum use of your time and ingredients!)

Day 2:
Day 3:
  • Breakfast: Pure Banana Pancakes
  • Lunch: Leftovers or if you don't have any, I do a kid friendly meal for my children of Ian's gluten free fish sticks or chicken tenders with a side of sweet potatoes.
  • Dinner: Chicken Tacos
Day 4:
Day 5:
  • Breakfast: Eggs (Scrambled, Hard Boiled, Fried) and Keefer
  • Lunch: Yet again, leftovers...but try something different, if you have leftover salad and pork tenderloin, add cold tenderloin pieces to your salad and enjoy...same meal, new spin on it!
  • Dinner: Pineapple and Ham Kabobs , Sweet Pepper, Grape tomatoes, Tossed Salad Greens and Pineapple Cilantro Lime Dressing
*For the dressing add a half can of pineapple or more depending on the sweetness and thickness of the dressing.  I prefer to add a fresh pineapple and its juice. or use this alternative recipe: 

Paleo Lime Pineapple Dressing 
Delish dressing for fruit and vegetable salads
Juice of one lime
1/2 Cup pineapple juice
1 Tsp ground ginger

Day 6:
Day 7:
Sweet Treats:

    Friday, March 8, 2013

    Feeling a Little Frisky for Italian

    It's "Featured Fridays"!  Welcome to Friday where I will feature a recipe/meal option that I have tried and my family has LoVeD, generally found on Pintrest!!!  If you're looking for an amazing meal to try out over the weekend that is a healthy alternative to the starchy pastas, look no further!!!!  Now non-dairy eaters, this one is NOT for you.  I generally avoid dairy for the most part, but very occasionally I will add in a little as my children are cheese lovers!!!

    So wait no longer the featured meal of this Friday will be:


    ***Tips - Do not skip the step in the recipe of extracting the moisture to the zucchini...you WILL thank me later, trust me, or you will have Zucchini Lasagna Soup & I replaced the ground beef for ground turkey and it was AMAZING!!!!


     ***Tips - do not use blanched almond flour for this recipe!!!

    Enjoy.

    Thursday, March 7, 2013

    7 Days to Successful Meal Planning: Day 7

    The final step to successful meal planning, STICK WITH IT!!!  It's challenging but so rewarding.  The time and money saved will be astonishing.  Although it's hard in the beginning it will become easier with time.  Be patient with yourself and learn to enjoy this time. 


    Wednesday, March 6, 2013

    7 Days to Successful Meal Planning: Day 6


    Are you ready for today?  Well you're going to want to set aside some time and gather all of your groceries.  We're going to meal prep today from your meal plan for as much of the week as possible.  I also hope that you have baking dishes, storage containers, etc.  Sorry, I should have pre-warned you...I sometimes forget that not all kitchens are completely stocked with fun utensils and storage containers as mine. (I am a bit of a kitchen utensil junkie...after all, that is what makes cooking so much fun.)

    The truth of the matter is this step is quite time consuming when you first start.  However, although it seems time consuming in the beginning you'll find even in the first week that it will save you an immense amount of time. I have tried a lot of different tactics to meal prep, prior to finding the tactic that works best for me.  So here it goes...I prep nearly EvErYtHiNg to completion all in one day to  ensure that I am using what's on my meal plan and to avoid those easy trips to a restaurant as a last minute excuse to not have to make dinner or a forgotten ingredient.

    This doesn't take a rocket scientist to figure out how to do it, as you bring everything up to it's final step minus baking.  No one really wants leftovers every night, as there is nothing that is so good as a freshly prepared dinner.  So if I'm having a steak dinner with a tossed salad, I will trim the steaks place the steaks in a leak-proof container in their marinade of choice and let them be till the night they make their arrival. Even better, if my husband beats me home and is feeling like doing dinner for me, he simply checks the menu and fires up the grill!!!  Casserole type dishes, I will go as far as the step immediately before placing it in the oven and put some foil or a cover over it and place it in my fridge.   Crockpot meals?  I place those in storage containers and then dump right in the crockpot morning of on my way out the door.  Often times I have more than one meal a week that I need my crockpot for, so I will go ahead and prep the first meal in the removable container and store the rest.  Soup...made up to the point of throwing into the sauce pan and warming it up.


    The best part of prepping all of your meals at once...your "dish" has the chance to mingle with all the other spices/ingredients allowing for maximum flavor!!!  Also, you pretty much only have to clean up the table afterwards as all your prep dishes were all washed at one time!!!  Counters are clean for the most part and the evening is yours for the taking. 

    Sooooo, what are you waiting for?!?  Let's get cooking and see how you do???  As I'm wrapping up here, I know that the days that I do everything doesn't work for everyone.  I just happen to have off on Tuesdays and Wednesdays so I do my shopping and prepping on those days...prior to having those days off I did it all on the weekends.  My meal prepping usually takes me approximately two hours to prep roughly 19-21 meals.  Not bad when you start adding up the time you spend from start to finish each night in the kitchen when you aren't doing any of the prep work!  Enjoy yourself during this time, have a glass of wine, turn up your favorite tunes, lock the kids in their rooms (just kidding), and allow yourself to enjoy this time...after all you're becoming a "Domestic Diva"!!!

    Monday, March 4, 2013

    7 Days to Successful Meal Planning: Day 5

    So now that we have meals listed out on our calendar and have inventoried the food that we already have stocking our cupboards, refrigerator, or freezer...we will need to come up with a grocery list.  I do not usually do this after I have created a meal plan because I find it easiest to do at the same time I add the menu items to the calendar and have the ingredient lists in front of me.

    Take a look at the templates below to see if any of these would work for you.  The first one is rather simple, and would work best for planning one meal a day, but we all need to start somewhere.  It is graciously provided by Mindfully Frugal Mom:


    I am a little more detailed in my meal planning and use a different template such as the one listed below provided by The Jones Family, I like it because it is very simple and provides you area to plan for 3 meals a day and includes a snack!  I also like that it gives you ample room to list out your groceries.  The only thing that I could think of to make this better would be to add a category list in the right hand section to make your shopping easier:


    Here is yet an even more in depth tool that would capture even more of the art of meal planning and using first what you have and then with a shopping list area by ecoMomicalMe, I personally dislike having to much paper around or to many calenders to maintain, so this would be a bit to much for me, but all in all it has great substance to it as far as meal planning and design goes:

    Finally for all you tech savvy readers, all of these listed above are great tools to use, but for those of you who have a smart phone or prefer paperless, I personally have found the app "Buy Me a Pie" to be the best solution.  I plan out my meals on paper, but add my grocery list items to my app to keep them at my finger tips.  The app allows me to create shopping lists in my phone and add items to each list by color category, making grocery shopping with three small children much easier.  Seeing that all of my groceries are color coded by produce, dry goods, meats, etc. I am able to shop each area of the grocery store quickly and effectively and hopefully without forgetting an item.   Better yet, you can use this app for free for the simpler version, but if you would like the full app that is totally worth it, there is a small fee to upgrade.  You're also able to create multiple lists in this app, because maybe you're like me and you have different stores that you go to for particular items.  Or you think to yourself, next time I go to Target I really need to pick up "...".  Create a list to make it even more user friendly.  I have had great luck with this app and believe me I have tried my fair share of grocery shopping applications.  But this one by far has my vote.  I have included a little snap shot of the screen for your viewing pleasure:

    Finally prior to closing up this blog post before I have lost your attention from all of my ramblings...by the way this is my blog and I'm the rule maker on here, so I am free to do that...let's discuss grocery shopping a little bit.  So you now have this wonderful grocery list that is color coded and mapped out, now what?  I know, it's pretty logical, we are going grocery shopping.  I personally prefer to grocery shop on Tuesdays.  Why you ask?  Well, I am not exactly fond of waiting in line and prefer fully stocked shelves of the items I need and have prepped for prior to running to the store.  I find that if I shop on Saturday, it's just mad chaos with people trying to get all of their errands out of the way.  The shelves are picked over and the options are limited...but Tuesdays, grocery shopping is a breeze.  The options are endless as the trucks have been delivered on Monday and the stock is fresh and replenished from the weekend rush.  The isles are far less crowded and my time is far less consumed.  If you are really lucky and are able to do this in the morning on a Tuesday you have your work cut out for you!

    I'm sure you're thinking...okay day 5 out of 7, what could possibly be left...but trust me you don't want to miss out so come back to find out what's left to create the most effective meal plan from start to finish.


    Monday, February 11, 2013

    7 Days to Successful Meal Planning: Day 4

    Day 4: Keeping a list of your favorites. 

    We all have our favorite recipes, the tried and true.  If you always have tacos on Tuesdays, there is no reason not to...put it on Tuesdays, heck...one less day you have to "really" plan a week.  We have favorites at our house as well.  Those that have the stamp of approval from the littles and those that have been asked to please not be made again.  For your convenience I will put a star on each recipe that my kids beg for...you will be shocked...and trust me I am too sometimes. So when you see the little *, it will equal kid friendly.

    Now, while we are talking about what to put on your menu, you will notice that most of the items that are listed on my meal plan are not going to contain any of the following:
    • grains
    • gluten
    • legumes
    • refined sugar
    • and only very occasionally will you find dairy
    This being said will come to no surprise to those who know me well, but my family eats a diet known as "Paleo Nutrition".  We will ocassationally eat a "Primal Diet" and that being only different from Paleo based on that Primal Nutrition includes dairy and Paleo does not.  To learn more about Paleo Nutrition please click on the Paleo tab located at the top of your screen.  To learn more about the reasons behind my choices to eat this way please click on the tab About Me.

    So let's get down and dirty...hee hee...let's make a plan for the week.  Refer to day 3 to see your mapped out schedule and let's begin.  My meal plan will consist of a maximum of two nights in a week of red meat.  Red meat sits in your belly and takes quite a while to digest.  It also isn't very friendly on the waist line.  The meals that I create focus on the maximum amount of veggies that I can cram into a meal without my children noticing and plenty of lean meats.  (Generally Turkey or Chicken.)  Don't be afraid to try new things either!  So for starters put the meals that take the longest on the nights that you have the most time to spend in the kitchen.  For the nights that life doesn't seem to have enough time to do a thing, a roast with loads of veggies in the crockpot will do!  Trust me, there is nothing better than coming home to the aroma of food being cooked in the crockpot, let alone hot and ready when you walk in the door!  So hop to it...see if you can come up with 7 full meals...

    Before you do that, don't forget what we did on day 1!!!  Remember all of those items that are in your fridge and cupboards that need to be used up before they expire...try to come up with as many recipes that use up those ingredients first.

    This will become easier as time passes and you have more experience.  If you like, use my weekly meal plan post for your family!  

    Sunday, February 10, 2013

    7 Days to Successful Meal Planning: Day 3

    Day 3: What does your week look like?

    I know what you're thinking, "Good grief lady!!!  It's day 3 and we still don't have a meal on the plan!" Relax...we're getting closer.  Day 3 is all about planning your week.  I'm guessing you or your family are busy.  Regardless if it's sports, extra curricular activities, hanging out with friends, late night work meetings...we all have things going on and generally these events are cram packed right during or around meal time.  I can't tell you how many times I have come home from work and thought, "Let's just go out, I don't feel like cooking tonight or don't have time".  Well, maybe you don't have to if you plan out your week.

    Map out your calender to best reflect what is going on during your week.   Call me a bit old fashion, but I maintain a family calendar right on my refrigerator.  I really like to have it mapped out right in front of me in Grand Central Station, otherwise known as my kitchen.  However you keep your schedule or whereever you keep your schedule you need it for day 3.

    In my home we generally eat at the same time each night give or take 30 minutes.  It tends to keep the munchkins happy that way.  So I plan my meals based on what we are doing each night.   If we are going to be eating out one night, I write it on the calendar. If it's going to be a night where I won't have enough time to even warm something up between work and wherever we're running off to, I mark it off as a crockpot meal.  I do this for each day to ensure that I have the adequate meal planned out with as little stress involved as possible.  This generally takes me less than 90 seconds.  So don't you worry, this isn't as time consuming as reading this post is! :)  I also try to anticipate one "large" meal and put it at the end of the week...this is my, "Just in Case We Have Company" meal.

    There you have it...it concludes day 3.  Know what you have going on during the week to plan accordingly.  You're not going to want to miss Day 4 as we're going to start putting food on your meal plan!

      Wednesday, February 6, 2013

      7 Days to Successful Meal Planning: Day 2

      Day 2: Organization

      If you completed Day 1, by taking inventory of your food, knowing what you have and ridding yourself of all those items that are unhealthy, expired, etc. you are all set to move into the organization stage of meal planning.  We are about to organize your cupboards, pantry, freezer, fridge, etc.  That's right...those pesky organization crazy ladies, I'm one of them.  I can't function if I don't have my pantry organized.  If it's canned and tomato...it's going to be with the canned goods and tomato products. If it's a baking good such as almond flour and coconut flour they are gong to be found in the containers in my pantry.

      Just to show you that I am not just blowing smoke, I will show you the inside of our pantry...it's tiny, minimal, and perfect for my needs.  It has been modified by adding little shelving units to give us some extra shelves, but it suits its purpose...and yes people, I don't keep much on hand.  If you decide to use my meal planning, you'll notice that most of this isn't even stuff I use...I maybe use a quarter of it, the rest I probably need to just toss or find a good home for...anyone eat beans? They are rarely, if ever used on my meal plan...and I could use these little containers much more appropriately for things that I do use.

      Maybe you're wondering where I found all my containers without spending a fortune?  I am a "Maxinista".  I love TJ Maxx!!!  I frequently shop their kitchen section for fun/practical reasonably priced storage containers.  And when I find what I want, I buy it...and buy it to what I plan on using it for.  These containers are perfect for stacking.  I try not to buy all the same as they fit much better and make for much easier stacking.  Stay away from bulky jars or from round containers.  These take up essential space.

      Next area, the one that I dread...the fridge.  This is pretty much what it looks like when it is almost grocery day...it just never looks pretty.  I'll post what it looks like on a regular day coming up here soon!  But this is what it looks like. 

      Next, here are my liquids...oils and vinegars...and then last but not least, my spices.  My spice cabinet is a work in progress.  I'm too cheap to buy all matching glass bottles, but it's on the list.  Archer Farms spices are a little spendy, but as I do it one at a time I replace the plastic with the glass...and when I run out, I refill with spices I buy from the bulk supply.  (You can see those containers on my bottom shelf...I prefer when they come in plastic bags rather than containers because I know I pay more for those little containers.)

      So there you have it, nothing special, but organized and minimal.  I find it easiest to know what you have and where it is...this also helps when coming to planning your meals and creating your grocery list.  You're one step closer to creating a successful meal plan. 


      Tuesday, February 5, 2013

      7 Days to Successful Meal Planning: Day 1

      Day 1: Inventory Your Food

      Who knew it could take seven days to create a successful meal plan?  Well, in order to begin we really need to take a look at what you already have by taking an inventory  of your current food supply.  What's in those cupboards, pantries, fridge, freezer, etc?

      The most successful thing that you can do is to see what you have and build your meal plan off of what you already have in stock, as long as it is healthy.  As you continue this journey with me, I'll help you to decide what benefits your health and what doesn't.  I can promise you this though...if it comes in a box, such as Hamburger Helper and similar items, has lot of ingredients you are uncertain of, or contains artificial ingredients...let's just put those in the food pantry donation bag.  I'm sorry, but there is just no way that these items are going to make the cut.

      Start with your fridge...checked your condiments lately for expiration dates?  This usually is the best place to start.  I find this is where time slips by quickly and my condiments don't seem to be following suit.  Keep a wastebasket near, because if this isn't something that you do often you may be surprised. Check expiration on essentially everything, toss or keep? I keep a list of what needs to be used in what order (at this point it doesn't have much in it other than what's on the meal plan.) I try to use everything I can with maximum freshness in mind.  I also don't want anything to go to waste, remember...Mercedes Diet, Kia Budget.  So if you have something that's going to be going badly quickly, let's plan on using those up first.

      Know what you have and we'll see you tomorrow for Day 2 of 7 Days of Successful Meal Planning!!!

      Sunday, February 3, 2013

      Reading Your Produce Labels

      I have touched on shopping on a small budget and organic vs. non-organic; but, there is something that is very important before piling your carts full on non-organic, clean 15 products.  (see previous post for more information)  GMOs...dun, dun,dunnnnn....Genetically Modified Organisms.  It is no secret that pesticides are harmful, or that we can not genetically modify something without modifying it's consistency.  GMO's have been linked to some of the leading diseases in our country, effecting millions!!!  80% of our supermarket store shelves are made of Genetically Modified Organisms.  That only leaves us with 20% to shop from!!! I think that this is where the "Just By Organic" becomes an easy go to for individuals.  There is a lot less stress of wondering about the makeup of your food, and it's time saving for many of us, but not necessarily economical.  So how do I know what to buy?  What brands are not genetically modified?  How can I tell if my produce is?  How do I find enough time or knowledge to shop smart?

      Well that's what this blog post is for.  Making it easy on consumers with as little effort as possible while still selecting the best items at the lowest cost for our families and ourselves.  The website True Food Network is an excellent source for information and a one stop shop to get you most of the tools you need to successfully complete your grocery shopping list with the most nutrients possible for you and your loved ones.  So if you have a smart phone, I completely recommend getting it out right now and downloading their free app to your phone...search True Food Network, click on install, and tahdah!!!!

      Right at your finger tips you have one of the most excellent sources of information!!!  It comes complete with tips to grocery shop, what to buy and what not to...what brands use GMO's and who doesn't.  Guess what, it's not all organic!!!  ***Please note, there is nothing wrong with buying all organic if you can, but for those of us that aren't able too...this is for you!!!  So for those of you who don't have a smart phone, don't worry...it's not nearly as convenient, but...I posted a printable version for your review, The Shoppers Guide to GMOs!!!

      Okay, so now you have all of that information, but what about those little stickers on produce...do they tell you anything?  Oh yes they do, they are called a PLU number!!!! It's not just an inspection sticker like you find on products identifying the individual who inspected it, it is a formula for the educated shoppers like you and I...and here is how it works, it's as easy as 4, 8, 9:

      PLU Numbers on Produce Stickers:
      • Organic produce has a 5 digit PLU number that begins with the number 9.
      • Conventional produce has a 4 digit PLU number that begins with the number 4.
      • Genetically modified (GMO) produce has a 5 digit PLU number that begins with the number 8.

      The information posted below is a little cheat sheet full of fun facts if you're interested, it's bright, colorful, and full of useful information regarding GMOs:


      **The purpose of this blog is to help individuals looking to gain a healthy lifestyle by eating nutritional food items to be able to do so by using this as a guide.  It is intended to lay the foundation of meal planning, understanding how to grocery shop and collecting nutritional information for your review.  I'm not an advocate for anything other than a healthy lifestyle with healthy food choices.

      I appreciate all those who read my posts and am welcome to questions, comments, etc.

      Best of luck in the grocery isles by hopefully using this information!!!  Until next time, as I explore "7 Days to Successful Meal Planning!!!

      Saturday, February 2, 2013

      Eating a Mercedes Diet on a Kia Budget

      This is in no way a rip on Kia or a promotion for Mercedes, but wouldn't it be nice if we could all afford a Mercedes.  I look at groceries in the same way. There is Whole Foods and then there is Dollar General.  They both carry groceries.  So what's the difference?  Although both are groceries, just as Kia and Mercedes are both cars, they are very different from one another.  When looking at a car, they may appear to have a similar shell, paint color, trim, tires, but just because the exterior is similar, the make up from one to the next is very different in quality. 

      Let's take an apple as an example. Both are shiny red, a brown stem, and are grown on trees...so what's so different?

      LOTS!!!  To best describe the difference and it's health effects, Forbes released an article in 2012 titled, "Pesticides, Healthy Communities, and You".

      I'm trusting you checked out the article as it's a very short read...but what's my point...how is this related to this blog post???  Well, when I think organic, I think in terms of purchasing a Mercedes...but how do I purchase a Mercedes on my Kia budget?  Let's face the music ladies and gentlemen, I am living on a Kia budget. (Again, if you drive a Kia, this is not a put down, just an analogy.)  Do you  purchase everything organic, even if it's not in your budget?   Do you need to purchase everything organic? Do you (meaning myself, and this is the most common question people ask me about healthy eating) purchase everything organic?  Well, the answer is "no"!

      My general rule of thumb is are you eating the skin or if it doesn't have skin, buy organic.  Now this doesn't apply to everything as farmers grow crops very differently from one crop to the next.  Some crops don't require any pesticides and on that note, if they did use pesticides it would completely devastate the entire crop...such as broccoli.  So do I buy those organic? Nope, remember...Kia budget...Mercedes diet.  So how do I know what to buy?  I follow my cheat sheet. perhaps you have heard of it, "The Dirty Dozen and the Clean 15".  Below are two examples:


      So, here it is, this is how I do it...my Kia budget makes its first stop at Aldi's!  Yes that's right, I said Aldi's, and don't you forget your quarter...or you will be without a cart.  But don't get to hung up on that quarter...you'll get it back as long as you return that cart...and you better because this is Kia budget...Mercedes diet.  As much as this sounds like the complete opposite of everything that I have already said, my local Aldi's usually carries about 50 - 80%, given the week, of everything that I put on my list to buy in the organic section!  Guess what, it even costs a fraction of what I would pay for it non-organic at my favorite stores to shop!!!  Trust me folks, I'm cashing in where I can, because I want to make sure I get the best bang for my grocery budget!!!  While you're there, make sure you check out the non-organic items on your "Clean 15" list, you wouldn't want to miss out on a good deal!

      So tip #1: you don't have to shop expensive to eat well by doing a little homework.  Watch your local grocery flyers and know your prices before leaving the house.
      Tip #2: It isn't necessary to eat everything organic.  Although some would and possibly will argue this tip...but remember, we are trying to eat a Mercedes diet on a Kia budget.
      Tip #3: Meal plan, so stay tuned and visit me again for "7 Days to Successful Meal Planning" right here!


      ***subscribe to this blog, follow me, or submit your e-mail address to get updates straight to your inbox to get the most up-to-date




      Tuesday, January 29, 2013

      Weekly Meal Plan

      • Welcome to the new site!  I am so excited to be here and excited to share my meal plan and tips with you.  So here it goes, the first weekly meal plan!!!

      Day 1:
      Day 2:
      Day 3:
      Day 4:
      Day 5:
      • Breakfast: Pumpkin Granola (I recommend making a LARGE batch of this!)
      • Lunch: Yet again, leftovers...but they are sure delicious
      • Dinner: Taco Soup

      Day 6:
      Day 7:
      Sweet Treats: