Sooo, this has not exactly been a stellar week for me. I have had extra kids every day and my focus, well, what focus is really the question. My intentions for going grocery shopping, creating a meal plan, and well picking up the supplies that we need for our home have been put off. So yesterday I found myself with a sink full of dishes and a dishwasher waiting to be washed...but no dishwasher detergent. Which brings us to Thoroughly Clean Thursday! What was a girl to do, of course you can't use dish soap in the dishwasher, that's just asking for a mess...or could I???
It was worth a shot and a shot I was willing to take as I couldn't leave the house and not willing to hand wash all those dishes. So with shrugged shoulders I figured why not, what's the worst that could happen, a clean kitchen floor?
So here is the rest of the story:
After trying out a pin from Pintrest to clean your dishwasher there was a recommendation to use baking soda and vinegar in your wash...I also have recently been looking up recipes for dish detergent, which all include borax and washing soda, but no baking soda. So here is what I decided to do, and although I'm not recommending this for every load, it worked in a pinch, and today I will give in and pick up the ingredients for my dish detergent that if it works, I'll be posting in the upcoming week:
1 Tablespoon Mrs. Meyers Liquid Dish Soap
1/4 cup Baking Soda
1/4 cup Borax
White Vinegar as a rinse agent in my rinse container
Guess what, it worked. My dishes were clean and there was nothing stuck on or anything and my kitchen floor, well that still needs to cleaned. The baking soda prevented the liquid dish soap from making a massive mess on my floor!
So if you're in a pinch, give it a try! :)
Thursday, March 28, 2013
Wednesday, March 27, 2013
Raspberry-Granola Pancakes
I love pancakes on a cold morning. It's still quite chilly here in Northern Wisconsin for the end of March. Nearly Easter, and I'm thinking that this recipe is perfect for Easter Morning. You'll want to make the granola ahead of time if you're planning on making it from the recipe linked below. I found this recipe in an advertizement in my most recent Clean Eating Magazine. Which by the way is a fabulous magazine full of nutritional information and great recipes!
Raspberry-Granola Pancakes
Once Again Organic Sunflower Seed Butter
Makes 12 pancakes
Ingredients:
1 cup blanched almond flour
2 tbspgranulated sugar Honey or less
1 1/2 tbspbaking powder Apple Cider Vinegar
1/2 tsp salt
1 cup unsweetened vanilla almond milk
1 large egg
1/3 cup Once Again Organic Sunflower Seed Butter
2 tbspbutter coconut oil, melted
1 tsp pure vanilla extract
1/2 pint fresh raspberries, chopped
1 cup Paleo Vanilla Granola, without dried fruit ornuts
Pan spray Coconut Oil for pan
1. Whisk together the blanched almond flour,sugar honey, baking powder apple cider vinegar, and salt in a bowl.
2. Whisk together the unsweetened almond milk, egg, sunflower seed butter,butter melted coconut oil, and pure vanilla in a separate bowl.
3. Add the wet ingredients to the dry ingredients, stirring just enough to combine.
4. Gently fold in the raspberries and granola. Break up any large pieces of granola before adding. The batter will be thick.
5. Heat a nonstick pan or griddle over medium-low heat. The pan should not be very hot or the fruit will burn before the pancakes are cooked.
6.Spray
the pan with pan sprayGrease the pan with melted coconut oil. Add scant 1/4 cups of batter to the warm pan,
spreading the batter slightly with the back of a spoon. Cook slowly
until the edges are dry and the bottom is deep golden brown. Flip,
flatten gently with a spatula, and continue cooking until the other side
is deep golden brown.
7. Serve immediately with maple syrup.
Enjoy and Happy Easter!
Raspberry-Granola Pancakes
Once Again Organic Sunflower Seed Butter
Makes 12 pancakes
Ingredients:
1 cup blanched almond flour
2 tbsp
1 1/2 tbsp
1/2 tsp salt
1 cup unsweetened vanilla almond milk
1 large egg
1/3 cup Once Again Organic Sunflower Seed Butter
2 tbsp
1 tsp pure vanilla extract
1/2 pint fresh raspberries, chopped
1 cup Paleo Vanilla Granola, without dried fruit or
1. Whisk together the blanched almond flour,
2. Whisk together the unsweetened almond milk, egg, sunflower seed butter,
3. Add the wet ingredients to the dry ingredients, stirring just enough to combine.
4. Gently fold in the raspberries and granola. Break up any large pieces of granola before adding. The batter will be thick.
5. Heat a nonstick pan or griddle over medium-low heat. The pan should not be very hot or the fruit will burn before the pancakes are cooked.
6.
7. Serve immediately with maple syrup.
Enjoy and Happy Easter!
Monday, March 25, 2013
Weekly Menu Plan
Day 1:
Day 6:
- Breakfast: Scrambled Eggs, Sauteed Garlic and Spinach with a Paleo English Muffin
- Lunch: Soup and Salad of your choice
- Dinner: Hamburgers with sliced tomatoes, onions, guacamole and lettuce with sweet potato slices
- 2 lbs grass fed ground beef, 1/2 tsp. salt, 1/4 tsp. pepper, 2 free range eggs, 1 Tb. onion powder, 1 Tb. garlic powder
- Snack: Mood Boosting Juice
- Breakfast: Hard Boiled Eggs and berries (strawberries, blueberries, blackberries)
- Lunch: Leftovers
- Dinner: Tamari Honey Chicken with broccoli, and almond butter sauce
- Snack: Almonds and Apple
- Breakfast: Pure Banana Pancakes
- Lunch: Leftovers
- Dinner: Moist and Delicious Roasted Turkey breast with steamed broccoli, cauliflower, and carrots
- Snack: Leftover banana pancakes served cold with almond butter
- Breakfast: Eggs of your choice, fresh or sauteed spinach, sliced tomatoes, Canadian bacon rounds and English muffin
- Lunch: Paleo Turkey Salad Lettuce Wraps and carrot sticks
- Use this for the mayo
- Dinner: Bacon Wrapped Cilantro Chicken
- Snack: Handful of Almonds with Apple
- Breakfast: Crockpot Oatmeal topped with chopped apples, walnuts, and drizzled maple syrup
- Lunch: Leftovers
- Dinner: I know, leftovers again...but hey you have to use them up!
- Snack:Mood Boosting Juice
Day 6:
- Breakfast: Almond Flour Coconut Waffles
- Lunch: Left overs
- Dinner: Simple Tender Pot Roast with Holy Grail Gravy, Mashed Cauliflower, and Steamed Carrots
- Snack:Trail Mix
- 2 cups cashews, 2 cups almonds, 3/4 cup unsweetened raisins, 1 bag of Good for Life Chocolate Chunks
- Breakfast: Paleo Breakfast Smoothie
- Lunch: Leftovers
- Dinner: Paleo Orange Chicken & Asian Salad
- Snack:Trail Mix2 cups cashews, 2 cups almonds, 3/4 cup unsweetened raisins, 1 bag of Good for Life Chocolate Chunks
Sunday, March 24, 2013
Color Your Easter Eggs Naturally
Looking for way to naturally dye your Easter Eggs with your little ones? A sypecial thank you to Shine from Yahoo for sharing 8 Ways to Make Organic DIY Food Coloring.

There are so many great suggestions in this article to use natural alternative to the harmful dies to enjoy this tradition worry free, with a little extra elbow grease you'll be dying Easter eggs in no time.
Cleaning your Oven
Well, it's about time I do the dreaded duty of cleaning my kitchen, cleaning my oven. I'm not a fan of the high fumes left in most oven cleaners, seem to work and have an enormous amount of warnings, and come with a high price tag. So, thankfully Naturally Maid Cleaning has graciously shared her no fail technique with us on "How to Clean your Dirty Oven". She has three no fail techniques listed below:
The Old Standby Oven Cleaner
Heavy Duty Stain Cleaner
Make a paste using the ingredients and apply to the
inside of the oven. Close door and heat oven to 500-degrees for 60
minutes. Turn off oven and allow to cool. Wipe debris from oven using a
moist cloth or sponge. Rinse well.
Overnight Sensation
The Old Standby Oven Cleaner
- 5 TBSP Baking soda
- 4 TBSP White vinegar
- 3 drops hand soap or liquid dish soap
Heavy Duty Stain Cleaner
- 1cup Salt
- 1cup Baking soda
- 1cup Water
Overnight Sensation
- 1 cup of baking soda
- 1/2 cup of washing soda
- 3 tablespoon liquid dish soap
- Hot water
- 1/4 cup of white vinegar
Wednesday, March 20, 2013
Cold and Flu Healing Broth
Often when your searching for something to comfort a cold or flu chicken broth comes to mind. After all, isn't that what you're told to use? Faithful Provisions has a great broth that is sure to help kick a cold or flu.
The healing elements in this broth consist of:

Natural Healing Broth
The healing elements in this broth consist of:
- Lemon - strong antibacterial, antiviral, immune-boosting and weight loss aid
- Ginger - gastrointestinal Relief, anti-nausea, anti-inflammatory, immune boosting
- Garlic -antioxidant and antibiotic
- Cayenne Pepper - anti-irritant, anti-fungal, headache prevention, anti-allergen, digestive aid, anti-inflammatory, detox, and antibacterial
- Honey - anti-bacterial, anti-fungal, anti-fungal, reduces cough and sore throats
Natural Healing Broth
- 6 cups distilled water
- 1 whole lemon, juiced. Do not discard rind.
- 2-3 tablespoons of fresh gingerroot, medium slices
- 5-6 garlic cloves, crushed (Crush with the flat side of knife to release the juices, then drop the whole thing into your pot.)
- ¼ to ½ teaspoon cayenne pepper (to taste)
- Honey to taste
Instructions
- Put water in a medium saucepan on high.
- Add lemon (juiced) and entire rind, gingerroot, garlic.
- Bring to a rolling boil, then reduce to medium. Allow it to cook at a low, rolling boil for about 15 minutes. You will see the color begin to change and deepen.
- Add the cayenne pepper.
- Strain.
- Add honey to taste to individual cup.
Paleo Raw Vegan Chocolate Chip Cookie Bites
Twisted Tuesday is a day late but worth it!
I love sweets!!! I completely love anything that has chocolate and then add the word cookie dough and I am hooked! Well when I saw the recipe below from Averie Cooks I was hooked, but knew it needed some changes...but very minor!

I love sweets!!! I completely love anything that has chocolate and then add the word cookie dough and I am hooked! Well when I saw the recipe below from Averie Cooks I was hooked, but knew it needed some changes...but very minor!

Paleo sort of Raw Vegan Chocolate Chip Cookie Dough Bites
2/3 c raw unsalted cashews
1/3 c oats 1/3 c almond flour
2/3 c raw unsalted cashews
2 Tbsp ground flax seed
2 Tbsp Agave
2 -3 Tbsp Maple Syrup(Omit and use Agave to preserve true Raw Status if you care)
1 Tsp PURE Vanilla Extract
1/4 c Chocolate Chips - Enjoy Life chocolate mini's work best! (or to preserve true raw status, take 2 Tbsp Raw Cocoa Powder and add 1 TbspAgave Honey/Maple Syrup, optional dash of pure vanilla extract,
whisk and blend. Spread into a thin layer on wax or parchment paper,
freeze. Take frozen chocolate off parchment and crumble the shreds into
the mixture as your raw “chips”.)
2 -3 Tbsp Maple Syrup
1 Tsp PURE Vanilla Extract
1/4 c Chocolate Chips - Enjoy Life chocolate mini's work best! (or to preserve true raw status, take 2 Tbsp Raw Cocoa Powder and add 1 Tbsp
Recipe Yields: Approximately 17 1 tsp. size Cookie Dough Balls
These are made right in your blender. Combine the cashews and almond flour right in your blender until together you have a almond/cashew flour texture. Add flax seed and blend. Add remaining ingredients minus the chocolate chips and blend. Fold in chocolate chips and roll dough into balls. Store in refrigerator.
Enjoy, oh and from my standpoint...make a double batch!
Enjoy, oh and from my standpoint...make a double batch!
Monday, March 18, 2013
Menu Planning Monday
Day 1:
Day 6:
- Breakfast: Easy Crockpot Breakfast Pie
- Lunch: Cold Cut Sandwich on Paleo Bread
- Dinner: Zoodles and Squoodles Pizza Casserole with tossed salad and your choice of dressing
- Cooking tip: Zoodles and Squoodles is very watery and must sit for more than an hour to absorb all the liquid. If you meal prep, slice your yellow squash and zucchini and allow it to sit with sea salt on towels to release moisture while you begin to prepare other components of your meal(s). Then slice your noodles into linguini noodles and your casserole should have next to no liquid once it's done cooking. The reason that this is on Day 1 is so that you can begin with releasing the excess moisture while preparing days 2 - 7. This way by the time you complete meal 7 your casserole will be cooked and your refrigerator will be full of wonderful meals! :) ENJOY!!!
- Breakfast: Scrambled Eggs (no milk, just whisk your eggs and add some seasoning)
- Lunch: Leftovers
- Dinner: Crockpot Fajitas
- Modifications needed: Skip the packet of taco seasoning and use this recipe:
- One Packet: 1 teaspoon chili powder 3/4 teaspoon paprika 1 teaspoon cumin 1/2 teaspoon onion powder 1/2 teaspoon garlic powder 1/4 teaspoon ground coriander (Optional) 1/8 teaspoon cayenne 1/2 teaspoon salt
- Skip the shell and use butter lettuce or large romaine lettuce leaves
- For Paleo no sour cream - but a generous topping of guacamole and you won't even miss the sour cream! :)
- Breakfast: Broccoli and Tomato Omelet
- Lunch: Leftovers
- Dinner: Sweet Potato Cauliflower Soup
- Breakfast: Paleo Breakfast Burrito
- Lunch: Leftovers
- Dinner: Cashew Chicken with Asian Salad
- Modifications Needed:
- Sub out the brown sugar for Maple Syrup or skip it all together!
- Olive oil for Canola Oil.
- Almond flour for all purpose flour
- Breakfast: Pumpkin Espresso French Toast Rounds
- Lunch: Leftovers
- Dinner: Mini Paleo Meatloaf Muffins with Loaded Mashed "Potatoes"
Day 6:
- Breakfast: Paleo Seeds and Raisin Bars
- Modification: Skip the agave nectar and sub it out for maple syrup or honey
- Lunch: Leftovers
- Dinner: Paleo Fish Sticks and Twice Baked Cauli Tots
- Breakfast: Pure Banana Pancakes (we eat these at least once a week because they are great cold as a snack for the kids as well...and they are so quick and easy!)
- Lunch: Leftovers
- Dinner: Clean out the refrigerator because tomorrow starts a new meal plan!!! If you have leftovers, try to finish them up to go into the next week, or take a break from cooking tonight and go out to eat!!!
- Simple Strawberry Green Smoothies
- Almond Joy Sunday
- Paleo "Granola Bar"
- Paleo Chocolate chip Cookies
Friday, March 15, 2013
St. Patricks Day Snack
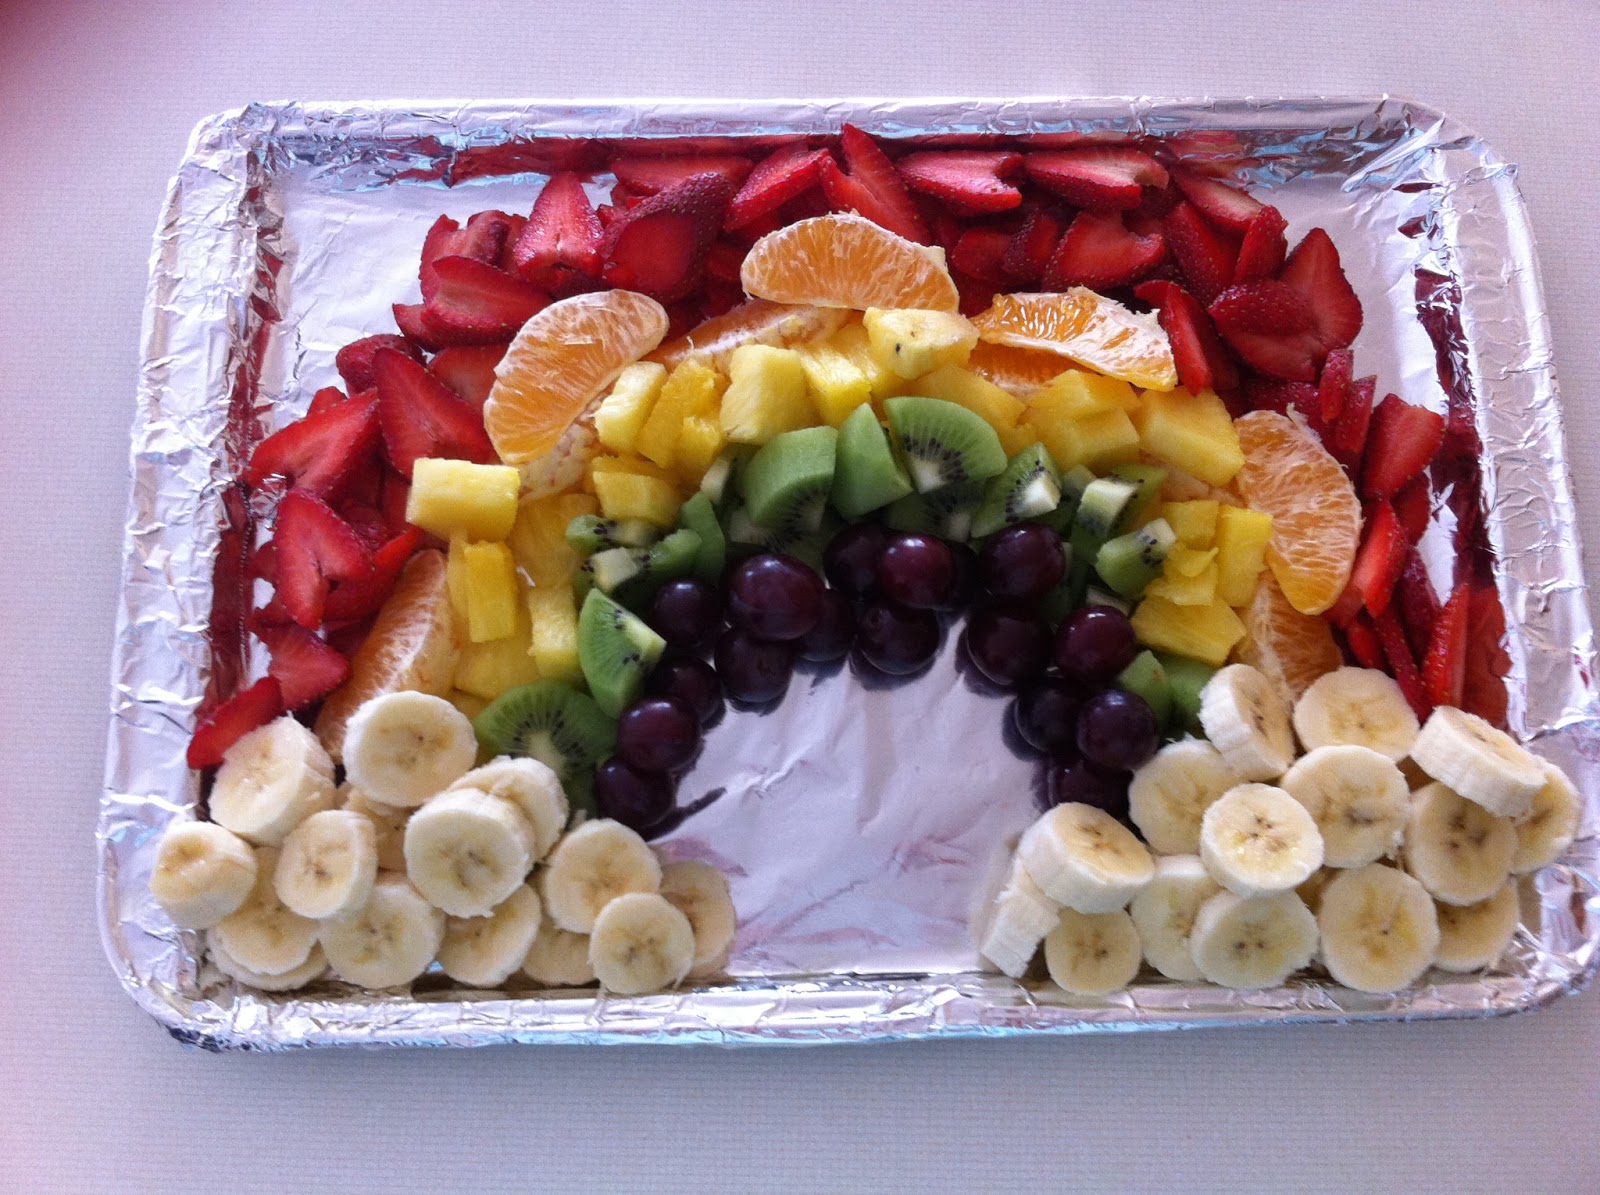
Happy Friday! It's almost St. Patrick's day and also my daughter's snack day at school. They are supposed to bring a fruit or vegetable for snack and when I send veggies, I tend to have them returned home hardly touched...where is the love for the veggies?
Sooo, this time around I decided that fruits were in order, and something St. Patrick's day"ish". After surfing around Pintrest for a while I finally found it, but of course with some modifications, here is the final product:

Sooo, this time around I decided that fruits were in order, and something St. Patrick's day"ish". After surfing around Pintrest for a while I finally found it, but of course with some modifications, here is the final product:
Ingredients:
Red = Straweberries (or watermelon, red apples, raspberries)
Orange = Oranges (or nectarines, peaches, cuties, etc.)
Yellow = Pineapple (bananas w/ peel on)
Green = Kiwi Fruit (or green grapes, green apples)
Purple = Red grapes (or blueberries, blackberries, plums)
Clouds = Bananas (toss or mist a little lime juice to prevent the bananas from oxidation or browning)
So what were the modifications you may be asking yourself? Well it was cute and fitting for the holiday so I'll share - marshmallows for one of the clouds and Rolos candies for a pot of gold on the other end of the rainbow. Unfortunately, these may look good, they have no value nutritionally, so bananas it is!!!
++My 5 year old and her class mates were quite pleased. Win-win for everyone!!! Enjoy and Happy St. Patrick's Day!!!
Thursday, March 14, 2013
Counter Spray
For years I have been using the same counter top spray. It smells good, it seems to do a good job and it is Eco-friendly...and then I bought a new sent of that same brand. It ruined it for me!!! The smell was so potent that I couldn't handle it anymore...no longer was it the smell of "fresh and clean" but floral gardens cheap body spray and it was overkill!!! It nearly made me sick to my stomach. So what was I to do? Water it down? Well I could, but then what good is the cleaner as it isn't cleaning as well as it had or was intended too. So I decided it's about time to make my own and Nature's Nurture had a great recipe!!!! (Not to mention one that I had all the ingredients too in my cupboard) Earth friendly and a fraction of the cost of my previous one...oh, and I made it by the gallon!! Even better!!!! I'm sure you're thinking but what are its results....well...they are substantially better then my "leading" brand cleaning spray!!! I know you're dying for me to tell you what it is so here is what you'll need:

Essential Oil Counter Top Spray
1/8 ounce Tea Tree Essential Oil
1/4 ounce Sweet Orange Essential Oil
1/8 ounce Eucalyptus Essential Oil
1/8 ounce Lavender Essential Oil
1 Gallon Distilled Water
*Make sure sure oils are 100% Pure Essential Oils and not just scented oils. The essential oils used are anti-bacterial, anti-infectious, anti-septic, and anti-viral. Also make sure that if you are making a large batch of this that you are using a glass container as the oils will break down the plastic container over time. Many health food stores will carry the glass containers.
If you are wanting to make a smaller batch to try it out, follow Nature's Nurture recipe:
1 cup water, distilled or filtered
5 drops orange essential oil
3 drops lavender essential oil
2 drops eucalyptus essential oil
2 drops tea tree oil
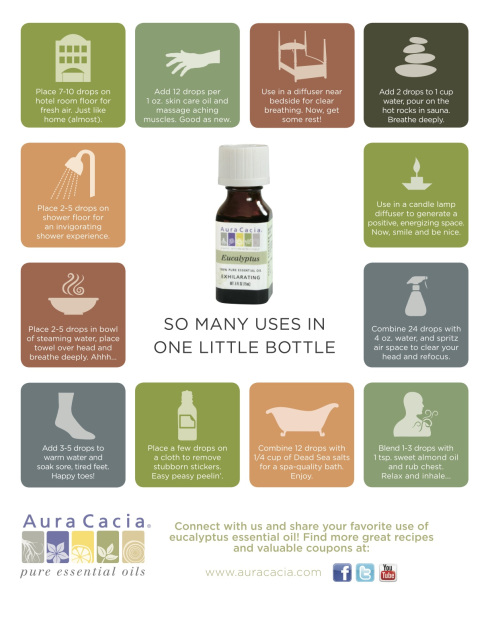
The best part about essential oils is that they have many uses other than just cleaning agents!!! Take a look at the following example of Eucalyptus oil:
Wednesday, March 13, 2013
Cold and Flu Relief
Cold and flu season was a beast this year! If you had the flu or have it now you know that it comes with nasty congestion, sore throat, and a heavy cough. If you haven't tried "Maggie's Cough Remedy" yet, it's a must try before hitting the relief isles at your local drugstore, a special thank you to Good Food Matters for this fabulous Wellness Wednesday recipe!
 MAGGIE’S COUGH REMEDY
¼ teaspoon Cayenne
¼ teaspoon Ginger
1 Tablespoon Cider Vinegar (an organic one, like Bragg’s, is preferred.)
2 Tablespoon Water
1 Tablespoon Honey (use a locally produced raw honey, if possible.)
Dissolve cayenne and ginger in cider vinegar and water. Add honey and shake well. Take 1
Tablespoon as needed for cough.
Note: This is potent albeit watery syrup. It also doesn’t dissolve perfectly. Always shake well before using.
After all, the philosophy of our home is that of Hippocrates, “Let food be thy medicine and medicine be thy food”.
Tuesday, March 12, 2013
Creating Paleo Slow Cooked Meatballs
You may have noticed that one of my menu items needed a bit of modification this last week. I forgot to help you out though to ensure you that all items would be gluten free:
For this weeks Twisted Tuesday we will modify the recipe (that I saw many of my friends pinning on Pintrest) of this weeks menu for the Slow Cooked Meatballs provided by "Stay for Dinner".

1 lb lean ground beef or turkey
½ cup fresh bread almond crumbs flour(1 slice of your favorite bread aprox. 3/4 cup almonds ground in a food processor or store bought almond flour will work as well)
1 tablespoon dried oregano
2 teaspoons fresh minced basil
¼ cupfinely grated Parmesan cheese skip it (or try this substitute: 1 cup Brazil nuts,1 teaspoon chopped garlic, 1/3 teaspoon salt. Process the three ingredients in a food processor till fluffy.)
¼ tsp salt
½ tsp pepper
¼ cup milk 1 egg
Remaining Ingredients:
½ large onion, chopped
16 oz (2 cups) of your favorite homemade (or store-bought marinara sauce - if you are using this make sure there are no added ingredients such as sugar!!!)
Instructions:
Combine all meatball ingredients in a large bowl using your hands Pampered Chef Mix and Chop. Do
not overmix. Roll Scoop the mixture into balls roughly 1 1/2″ in diameter using the Pampered Chef Large Scoop.
Scatter the chopped onion (chop this using the Pampered Chef Manual Food Processor) over the base of your slow cooker, followed by the meatballs. Pour the sauce evenly over the top, making sure to coat everything.
Cook on low for 6-8 hours.
For this weeks Twisted Tuesday we will modify the recipe (that I saw many of my friends pinning on Pintrest) of this weeks menu for the Slow Cooked Meatballs provided by "Stay for Dinner".

NOW PALEO Slow Cooked Meatballs
(serves 4)1 lb lean ground beef or turkey
½ cup fresh
1 tablespoon dried oregano
2 teaspoons fresh minced basil
¼ cup
¼ tsp salt
½ tsp pepper
Remaining Ingredients:
½ large onion, chopped
16 oz (2 cups) of your favorite homemade (or store-bought marinara sauce - if you are using this make sure there are no added ingredients such as sugar!!!)
Instructions:
Combine all meatball ingredients in a large bowl using your
Scatter the chopped onion (chop this using the Pampered Chef Manual Food Processor) over the base of your slow cooker, followed by the meatballs. Pour the sauce evenly over the top, making sure to coat everything.
Cook on low for 6-8 hours.
Monday, March 11, 2013
Menu Planning Monday

Day 1:
- Breakfast: Scrambled Eggs with Canadian Bacon and Diced Tomatoes
- Lunch: Petite Cucumber Turkey Sandwiches & Strawberry Almondade Yogurt Parfait (toasted Almonds and fresh sliced strawberries)
- Dinner: Rotisserie Chicken* & Steamed Broccoli with your choice of seasoning
Day 2:
- Breakfast: Butternut Squash Pancakes
- Lunch: Chicken Healing Soup w/ Heart Shaped Carrots
- Dinner: Slow-cooked Turkey Meatballs with Loaded Mashed "Potatoes"
- Breakfast: Pure Banana Pancakes
- Lunch: Leftovers or if you don't have any, I do a kid friendly meal for my children of Ian's gluten free fish sticks or chicken tenders with a side of sweet potatoes.
- Dinner: Chicken Tacos
- Breakfast: Hard Boiled Eggs and Keefer
- Lunch: Leftovers
- Dinner: Jamaican Jerk (see seasoning recipe if needed) Pork Tenderloin, Sweet Pepper, Grape tomatoes, Tossed Salad Greens and Pineapple Cilantro Lime Dressing
- Breakfast: Eggs (Scrambled, Hard Boiled, Fried) and Keefer
- Lunch: Yet again, leftovers...but try something different, if you have leftover salad and pork tenderloin, add cold tenderloin pieces to your salad and enjoy...same meal, new spin on it!
- Dinner: Pineapple and Ham Kabobs , Sweet Pepper, Grape tomatoes, Tossed Salad Greens and Pineapple Cilantro Lime Dressing
Paleo Lime Pineapple Dressing
Delish dressing for fruit and vegetable salads
Juice of one lime
1/2 Cup pineapple juice
1 Tsp ground ginger
Day 6:
- Breakfast: Paleo Breakfast Burrito
- Lunch: Paleo Roasted Tomato Garlic Soup
- Dinner: Honey Glazed Chicken and Bacon Bites with Roasted Carrots
- Breakfast: Banana Blueberry muffins
- Lunch: Leftovers
- Dinner: Zucchini Lasagna with Pizza Twists
Friday, March 8, 2013
Feeling a Little Frisky for Italian
It's "Featured Fridays"! Welcome to Friday where I will feature a recipe/meal option that I have tried and my family has LoVeD, generally found on Pintrest!!! If you're looking for an amazing meal to try out over the weekend that is a healthy alternative to the starchy pastas, look no further!!!! Now non-dairy eaters, this one is NOT for you. I generally avoid dairy for the most part, but very occasionally I will add in a little as my children are cheese lovers!!!
So wait no longer the featured meal of this Friday will be:


So wait no longer the featured meal of this Friday will be:
***Tips - Do not skip the step in the recipe of extracting the moisture to the zucchini...you WILL thank me later, trust me, or you will have Zucchini Lasagna Soup & I replaced the ground beef for ground turkey and it was AMAZING!!!!

***Tips - do not use blanched almond flour for this recipe!!!
Enjoy.
Thursday, March 7, 2013
7 Days to Successful Meal Planning: Day 7
The final step to successful meal planning, STICK WITH IT!!! It's challenging but so rewarding. The time and money saved will be astonishing. Although it's hard in the beginning it will become easier with time. Be patient with yourself and learn to enjoy this time.
Wednesday, March 6, 2013
7 Days to Successful Meal Planning: Day 6

The truth of the matter is this step is quite time consuming when you first start. However, although it seems time consuming in the beginning you'll find even in the first week that it will save you an immense amount of time. I have tried a lot of different tactics to meal prep, prior to finding the tactic that works best for me. So here it goes...I prep nearly EvErYtHiNg to completion all in one day to ensure that I am using what's on my meal plan and to avoid those easy trips to a restaurant as a last minute excuse to not have to make dinner or a forgotten ingredient.
This doesn't take a rocket scientist to figure out how to do it, as you bring everything up to it's final step minus baking. No one really wants leftovers every night, as there is nothing that is so good as a freshly prepared dinner. So if I'm having a steak dinner with a tossed salad, I will trim the steaks place the steaks in a leak-proof container in their marinade of choice and let them be till the night they make their arrival. Even better, if my husband beats me home and is feeling like doing dinner for me, he simply checks the menu and fires up the grill!!! Casserole type dishes, I will go as far as the step immediately before placing it in the oven and put some foil or a cover over it and place it in my fridge. Crockpot meals? I place those in storage containers and then dump right in the crockpot morning of on my way out the door. Often times I have more than one meal a week that I need my crockpot for, so I will go ahead and prep the first meal in the removable container and store the rest. Soup...made up to the point of throwing into the sauce pan and warming it up.

The best part of prepping all of your meals at once...your "dish" has the chance to mingle with all the other spices/ingredients allowing for maximum flavor!!! Also, you pretty much only have to clean up the table afterwards as all your prep dishes were all washed at one time!!! Counters are clean for the most part and the evening is yours for the taking.

Monday, March 4, 2013
7 Days to Successful Meal Planning: Day 5
So now that we have meals listed out on our calendar and have inventoried the food that we already have stocking our cupboards, refrigerator, or freezer...we will need to come up with a grocery list. I do not usually do this after I have created a meal plan because I find it easiest to do at the same time I add the menu items to the calendar and have the ingredient lists in front of me.
Take a look at the templates below to see if any of these would work for you. The first one is rather simple, and would work best for planning one meal a day, but we all need to start somewhere. It is graciously provided by Mindfully Frugal Mom:

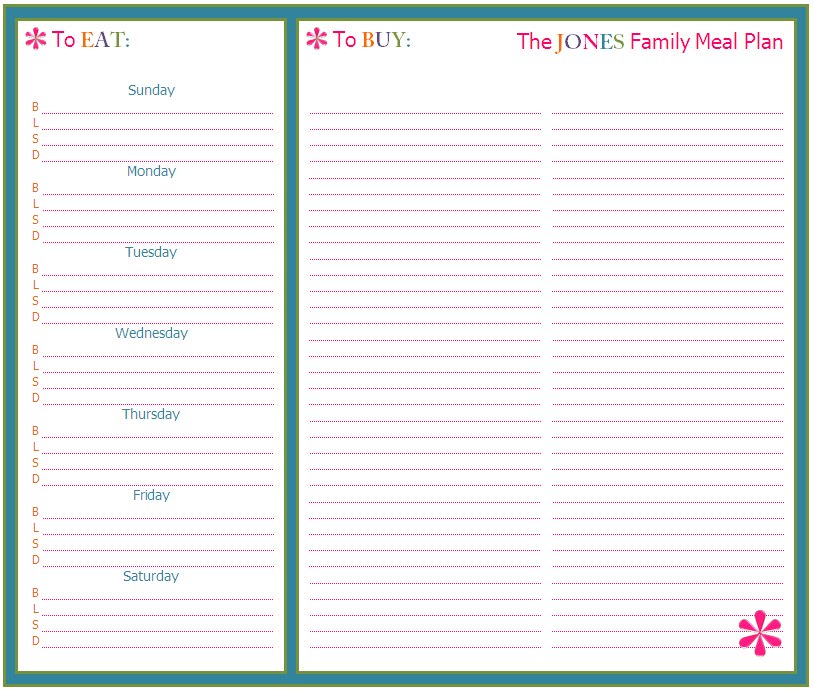
I am a little more detailed in my meal planning and use a different template such as the one listed below provided by The Jones Family, I like it because it is very simple and provides you area to plan for 3 meals a day and includes a snack! I also like that it gives you ample room to list out your groceries. The only thing that I could think of to make this better would be to add a category list in the right hand section to make your shopping easier:

Here is yet an even more in depth tool that would capture even more of the art of meal planning and using first what you have and then with a shopping list area by ecoMomicalMe, I personally dislike having to much paper around or to many calenders to maintain, so this would be a bit to much for me, but all in all it has great substance to it as far as meal planning and design goes:

 Finally for all you tech savvy readers, all of these listed above are great tools to use, but for those of you who have a smart phone or prefer paperless, I personally have found the app "Buy Me a Pie" to be the best solution. I plan out my meals on paper, but add my grocery list items to my app to keep them at my finger tips. The app allows me to create shopping lists in my phone and add items to each list by color category, making grocery shopping with three small children much easier. Seeing that all of my groceries are color coded by produce, dry goods, meats, etc. I am able to shop each area of the grocery store quickly and effectively and hopefully without forgetting an item. Better yet, you can use this app for free for the simpler version, but if you would like the full app that is totally worth it, there is a small fee to upgrade. You're also able to create multiple lists in this app, because maybe you're like me and you have different stores that you go to for particular items. Or you think to yourself, next time I go to Target I really need to pick up "...". Create a list to make it even more user friendly. I have had great luck with this app and believe me I have tried my fair share of grocery shopping applications. But this one by far has my vote. I have included a little snap shot of the screen for your viewing pleasure:

Finally prior to closing up this blog post before I have lost your attention from all of my ramblings...by the way this is my blog and I'm the rule maker on here, so I am free to do that...let's discuss grocery shopping a little bit. So you now have this wonderful grocery list that is color coded and mapped out, now what? I know, it's pretty logical, we are going grocery shopping. I personally prefer to grocery shop on Tuesdays. Why you ask? Well, I am not exactly fond of waiting in line and prefer fully stocked shelves of the items I need and have prepped for prior to running to the store. I find that if I shop on Saturday, it's just mad chaos with people trying to get all of their errands out of the way. The shelves are picked over and the options are limited...but Tuesdays, grocery shopping is a breeze. The options are endless as the trucks have been delivered on Monday and the stock is fresh and replenished from the weekend rush. The isles are far less crowded and my time is far less consumed. If you are really lucky and are able to do this in the morning on a Tuesday you have your work cut out for you!
I'm sure you're thinking...okay day 5 out of 7, what could possibly be left...but trust me you don't want to miss out so come back to find out what's left to create the most effective meal plan from start to finish.
Take a look at the templates below to see if any of these would work for you. The first one is rather simple, and would work best for planning one meal a day, but we all need to start somewhere. It is graciously provided by Mindfully Frugal Mom:
I am a little more detailed in my meal planning and use a different template such as the one listed below provided by The Jones Family, I like it because it is very simple and provides you area to plan for 3 meals a day and includes a snack! I also like that it gives you ample room to list out your groceries. The only thing that I could think of to make this better would be to add a category list in the right hand section to make your shopping easier:
Here is yet an even more in depth tool that would capture even more of the art of meal planning and using first what you have and then with a shopping list area by ecoMomicalMe, I personally dislike having to much paper around or to many calenders to maintain, so this would be a bit to much for me, but all in all it has great substance to it as far as meal planning and design goes:


Finally prior to closing up this blog post before I have lost your attention from all of my ramblings...by the way this is my blog and I'm the rule maker on here, so I am free to do that...let's discuss grocery shopping a little bit. So you now have this wonderful grocery list that is color coded and mapped out, now what? I know, it's pretty logical, we are going grocery shopping. I personally prefer to grocery shop on Tuesdays. Why you ask? Well, I am not exactly fond of waiting in line and prefer fully stocked shelves of the items I need and have prepped for prior to running to the store. I find that if I shop on Saturday, it's just mad chaos with people trying to get all of their errands out of the way. The shelves are picked over and the options are limited...but Tuesdays, grocery shopping is a breeze. The options are endless as the trucks have been delivered on Monday and the stock is fresh and replenished from the weekend rush. The isles are far less crowded and my time is far less consumed. If you are really lucky and are able to do this in the morning on a Tuesday you have your work cut out for you!
I'm sure you're thinking...okay day 5 out of 7, what could possibly be left...but trust me you don't want to miss out so come back to find out what's left to create the most effective meal plan from start to finish.
Subscribe to:
Posts (Atom)